Lightroom Mobile has a fantastic array of editing options, but if you want to get into the nitty gritty and do a more comprehensive edit, or you simply prefer editing on a bigger screen than your phone, syncing your images in the Lightroom ecosystem is the way to go.
In this tutorial, you’ll learn how to sync your images across all Lightroom apps so that no matter what device you’re on or what Lightroom app you’re using, you have access to the same library of images. Check out how easy it is to sync your raw photos, and read the steps that follow. With just a few finger taps, you’ll relish how efficiently you can switch from mobile phone to iPad to desktop and back again, without ever having to reload or transfer images. It will save you time and the major headaches of archive disorganization.
How to Sync Raw Photos From Lightroom Mobile to Lightroom Classic for Editing
The Basics
Adobe renamed its past Lightroom application to Lightroom Classic. Optimized for desktop workflows, it saves your images to a local hard drive on your computer. In order to sync images between Lightroom Mobile and Lightroom Classic, you need to purchase an Adobe Creative Cloud Photography plan, which provides you with the cloud storage access you need to transfer images between devices.
Creative Cloud plans and pricing for individuals vary from $9.99/month to $19.99/month and come packaged with other perks, apps, and GBs of cloud storage. (Businesses, students & teachers, and schools & universities are offered other plans and pricing.) You can also try it out by activating a free seven-day trial.
1. Open Lightroom Classic and Activate the Sync Feature
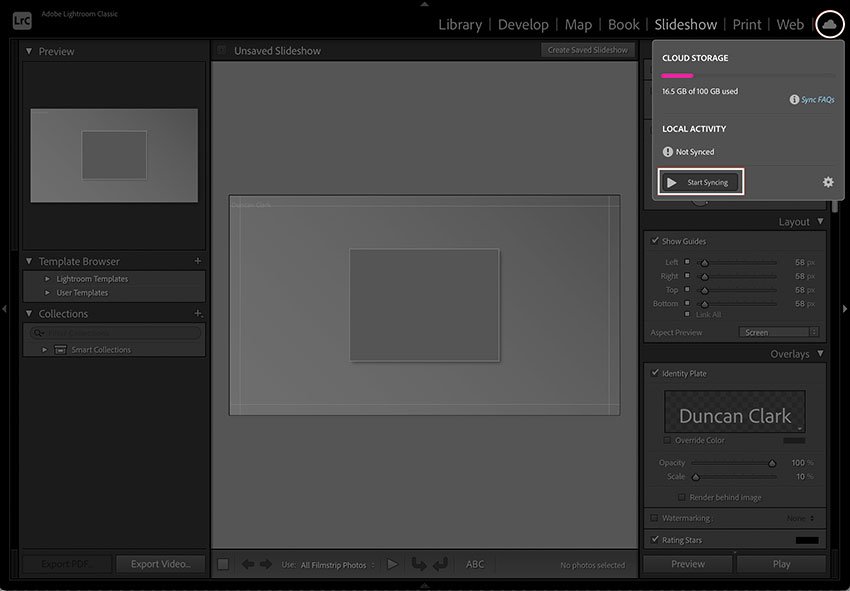
First, open Lightroom Classic. Click on the Cloud icon in the upper right and tap Start Syncing.


2. Receive a Notification That Syncing Is Complete
When the syncing is complete, a green checkmark and Synced is displayed. It may take a moment to complete the syncing process, depending on how many images are being synced. Syncing will now happen automatically whenever you open Lightroom Classic.


3. Open Lightroom Mobile and Start Syncing
Open Lightroom Mobile.


Then go to your Library and find the image or images you want to sync. If you want to sync all of the images in a given folder, click on the Cloud icon.


If you want to sync just one image, select it and click on the Cloud icon on the upper right with the green arrow.


An uploading-in-process notification is displayed.


Once syncing is complete, a green checkmark icon appears next to the cloud icon.


Incidentally, to access your sync settings, click on the Settings icon after syncing or up at the top.


Doing so gives you a bunch of options to tailor your Cloud Storage & Sync settings to your liking.


4. Open Lightroom Classic
To edit the images you synced in Lightroom Mobile, open Lightroom Classic. Select Library at the top, and under Catalog, select All Synced Photographs. Depending on your internet connection, it might take a moment for the image or images you synced in Lightroom Mobile to appear in Lightroom Classic.


5. Edit in Lightroom Classic
Select Develop at the top and edit to your heart’s content!


6. The Edited Image Is Saved
Select Library, and your edited image will be in view.


7. Syncing Is Automatic
Your edited image will automatically be synced throughout the Lightroom ecosystem, including Lightroom Mobile.


Enjoy Syncing Images Across Devices
The device you use to make a photo may very well differ from the device you use to edit it. Or you might be traveling and without a device. Forget the antiquated, time-intensive ways of the past using clumsy transfer processes. Syncing all your devices so that each one remains up-to-date and uniform will keep you organized and, best of all, bestow you with more time to do what you love: photograph!
Keep Learning About Lightroom and Photography
Here are a few more free tutorials and resources to help you study Lightroom and smartphone photography:


