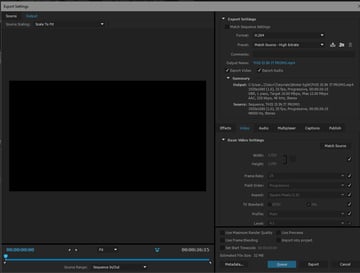
You’ve made your film, great! Now how do you get your finished video out of Premiere Pro in the appropriate format? There are export settings for everything, but we’ll go into the ones you’re most likely to need in this tutorial. Here’s a quick summary of the parts of the export process we cover here:
- How to Export Video from Premiere Pro: file export basics and essential settings (with tutorial video).
- How to Export Video for Collaborating and Storing Files: how to send clips back and forth when a team are working on the same project, when you should keep file formats the same, and when to keep the best quality footage you have.
- How to Export for Online Video: a brief look at codecs, particularly H.264 and H.265; when you can choose a preset and when to drill down further into the options and make purposeful changes to your export.
- How to Understand Constant vs. Variable Bitrate: what the difference is, why it matters, and how Premiere Pro will interpret your choice in terms of a trade-off between file size and quality.
How to Export Video From Adobe Premiere
There is no one-stop shop for export settings, unfortunately! The good news is you don’t need to know the ins and outs of bitrates and codecs to get something of high quality out of Premiere Pro and to your desired third party.
Brand new to exporting video? This lesson from David Bode’s free Adobe Premiere tutorial covers what you need to get started.
This course is very comprehensive and includes lessons on helping you to organise your files outside Premiere Pro, how to import assets and set up a project, and of course how to learn editing essentials like making cuts, adding audio and video effects, and much more.
Maximum Render Quality
Premiere Pro can use hardware and software rendering to produce a final image. Software rendering is slower, but useful for some types of video.
Clicking Render at Maximum Quality in the export dialog tells Premiere to go ahead and use software rendering if needed, typically if you’ve scaled, rotated, or repositioned part of your composition. It doesn’t engage if you don’t need it, so go ahead and turn it on when you set up your sequence and when you hit Export.
How to Export Video for Collaborating
If you’re lucky enough to have a trusted team working with you to produce your film, then you might be sending clips back and forth to each other, and ideally you won’t want those to be huge files. Premiere Pro has a great Shared Projects feature with Project Locking, where multiple editors can work on a film without overwriting each other’s work.
If you can’t, or prefer not to use this feature, then how to export really depends on what the other person will be doing with the footage. If they’re editing it for inclusion in the film, then you’ll probably want to send over the highest quality available: the original files straight from the camera. If they’re just adding some notes or markers that you can then overlay over your own footage, then you can export at a lower quality.
Keeping your formats the same will help your timeline function better, and if you’re applying a colouring effect or similar edit, you know it will have the same—or close to the same—effect right across the board.
The same logic applies when you’re storing old footage for posterity—always keep the best versions of the material you can. It’s a trade-off with space and a best guess at what you might need in the future.
Sidebar: What Are Digital Video Codecs?
A codec is method for compressing, and then decompressing, a video file (a bit like JPEG files for images), and there are a few of them. Video codecs are ways to get a high-quality result with a reasonable file size, though each comes with its set of advantages, trade-offs, and limitations. A codec is different to a video container (though some can be both) as the codec is how the video is compressed, and a container determines how it’s stored, opened, and played. For more details, check out Tom Green’s tutorial about video codecs here on Envato Tuts+.
How to Export for Online Video: H.264 and H.265
The standard for uploading video has, for a while, been a codec called H.264 (or Advanced Video Coding) which is designed to let you send high-quality video without it needing to be ridiculous file sizes. H.264 was the standard for Blu-ray discs and for Vimeo, YouTube, and other popular online video outlets.


As time and technology have marched on, we now have H.265 (HEVC), the successor to H.264, which promises 25–50% better data compression than its predecessor, and support for formats like 8k (Ultra HD). Whilst I’m sure the super tech bods could explain this in a lot more detail than I can, for those of us who want the short version: it encodes your video at the lowest bitrate it can, while keeping your image and audio high quality.
H.265 does, however, require more processing power, which is probably something to bear in mind depending on the specs of your computer. If you’re using a slightly older version of Premiere Pro, you might only have the H.264 option. Another very important consideration is that many machines just won’t have the H.265 codec, which means you can’t watch the video unless you download it, at a (small) cost.
Once you’ve selected H.265 (or 4) in Premiere Pro, you’ll be presented with some more specific options for your video, and it depends on your requirements as to what you’ll select. The most common ones you’ll probably use are the presets for YouTube or Vimeo, which will then give you the option to tweak other settings. You need to make sure that your source and output match in the settings. If something like your ratio is different, make sure that it’s deliberate (like if you’re downsizing); otherwise, they should match. In the Video box below, you can actually click Match Source which will help make sure your settings match.
The choices you make here are ones you want to produce the highest quality possible, so that when you upload to YouTube or Vimeo and they compress your video further, it still looks good. The Premiere Pro breakdowns are pretty good, so you don’t need to worry too much about making changes within the standard profiles if you aren’t confident about it. For web delivery, make sure Profile (in Video) is set to High.
If you have a free Vimeo account, remember that although you can upload 1080p, it’ll be downsized to 720p, so it’s worth choosing the 720 export option in Premiere Pro.
How to Understand Constant vs. Variable Bitrate
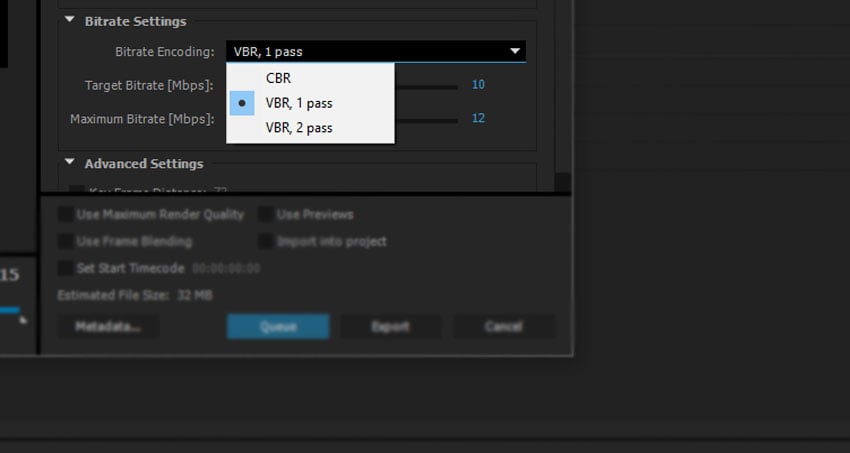
Part of the hierarchy in the export settings with H.265 (or 4) is the option to choose between constant and variable bitrates. Constant is, as you’d think, a standard bitrate across the whole film. Variable bitrate lets you set target and maximum bitrates, which means Premiere will aim for a certain amount of data throughout your video.


Shots that are more complicated need more data. With a variable bitrate, Premiere will up the allowance according to your maximum bitrate setting, keeping the bitrate of simpler shots down, so that your overall file size can be lower. If your ultimate destination is the web, you’re going to want a high bitrate for the reasons I mentioned earlier: it’ll get compressed again when you upload to various social media.
Client Considerations and File Sizes
If you’re sending your project to a client as an exported video, ask them about their requirements, because if you think about a feature length film, for example, rendering that out at highest quality might be a lot more than their machine can handle, and it might prove difficult to actually send. It might even be wise to render a couple of versions: one a much more compressed version, so that your client has options.
In Summary
Basically, what you need to know is what you want in the exported video. Is it quality that matters? Or maybe you’ll accept a bit less image quality for a speedy download. And then you need the patience to potentially make more than one version or render of the video to fulfil that.
A Quick Exporting Rule of Thumb
A good rule is that if size isn’t an issue, export to the highest settings and quality you can. If size is an issue, then begin a gentle trade-off between size and space. It’s a delicate balance, but certainly when it comes to exporting for online use, you’re in fairly safe hands with the H.264 option.
The best way to learn what you need for each eventuality is to find out the quirks of the third-party uploaders you’re using, like Vimeo downsizing on free accounts. That way, you can make the best decisions for your video, knowing that extra compression won’t ruin it. Learn to trust your eyes, and you can start to customise those settings as you get more confident.
Next Steps for Better Video Exports From Premiere Pro
Now that you know the basics of exporting your video from Premiere Pro, there are some other things you can start to think about.
Captioning Your Video
Adding subtitles or closed captions to your video can really help with engagement and accessibility. On Facebook, 85% of people are watching videos without the sound on, so closed captions can make sure they stick around and absorb your message. To learn more, try How & Why to Add Closed Captions to Social Media Videos. You don’t necessarily have to type it all out yourself either: check out how you can Subtitle and Caption Your Videos Automatically Using Artificial Intelligence.
Making Adjustments for Different Social Channels
Where once we’d have balked at the idea of square and vertical video, we now embrace it when it comes to social media outlets like Instagram. Find out How to Use Vertical Video Effectively and How to Use Square Video (For Social Media).
Making More Advanced Edits
Premiere Pro has really advanced in recent years, and now you’re able to create more advanced animations and effects right in Premiere Pro, rather than having to flip to After Effects. Learn How to Quickly Change Picture Styles in Premiere Pro With LUT Presets and even how to start creating your own templates with Premiere Pro for the Essential Graphics Panel.
Try These Premiere Pro Presets
Did you know that you can now download free Premiere Pro templates from Mixkit? Check out the wonderful array of templates over there, or read these articles for even more options.


